Showing posts with label java. Show all posts

Tuesday, August 23, 2016

Kubernetes Setup

This post is a walkthrough for getting Kubernetes environment up and running. (Truly speaking, it is more of a self note to get Kubernetes environment running.) We will use Vagrant as Kubernetes provider to configure a Kubernetes cluster of VirtualBox VMs.

Prerequisities
Get following componentes installed:

  • Kubernetes
  • Virtualbox
  • Vagrant
  • Docker

Step 1: Configure and start Kubernetes

Note: One change I had to make with Kubernetes 1.3.3 running on Mac using Vagrant as Kubernetes provider is to instruct Vagrant to not create ssh keys. I modified the Vagrantfile in kubernetes install by adding

config.ssh.insert_key = false

To start a Kubernetes cluster

export KUBERNETES_PROVIDER=vagrant 
export NUM_NODES=2 
cluster/kube-up.sh 

This will create three VirtualBox images namely master, node-1 and node-2. At the end of the process you will see messages on console like this.

Kubernetes cluster is running.
The master is running at:
  https://10.245.1.2 
Administer and visualize its resources using Cockpit:
  https://10.245.1.2:9090 
For more information on Cockpit, visit http://cockpit-project.org 
The user name and password to use is located in /Users/kartik/.kube/config 

... calling validate-cluster 
Found 2 node(s).
NAME                STATUS    AGE 
kubernetes-node-1   Ready     4m 
kubernetes-node-2   Ready     44s 
Validate output:
NAME                 STATUS    MESSAGE              ERROR 
controller-manager   Healthy   ok                   
scheduler            Healthy   ok                   
etcd-0               Healthy   {"health": "true"}   
etcd-1               Healthy   {"health": "true"}   
Cluster validation succeeded 
Done, listing cluster services:

Kubernetes master is running at https://10.245.1.2 
Heapster is running at https://10.245.1.2/api/v1/proxy/namespaces/kube-system/services/heapster 
KubeDNS is running at https://10.245.1.2/api/v1/proxy/namespaces/kube-system/services/kube-dns 
kubernetes-dashboard is running at https://10.245.1.2/api/v1/proxy/namespaces/kube-system/services/kubernetes-dashboard 
Grafana is running at https://10.245.1.2/api/v1/proxy/namespaces/kube-system/services/monitoring-grafana 
InfluxDB is running at https://10.245.1.2/api/v1/proxy/namespaces/kube-system/services/monitoring-influxdb 

To further debug and diagnose cluster problems, use 'kubectl cluster-info dump'.

Step 2: Run Docker image

Let’s start a simple Docker image. I will use the Spring Boot application Docker image that we create in the last blog entry - Setting up development environment with Docker, Maven and IntelliJ

To configure the authentication for Docker private repository

docker login [server]

This will create credentials under your $HOME/.docker/config.json

To start docker image that is available locally on Docker

kubectl run options --image=kartikshah/options-analyzer --replicas=2 --port=8080 
deployment "options" created 

It will take a minute or so for the pods to get to Running status. If you catch them in act of starting up you will see ContrainerCreating Status.

$ kubectl get pods 
NAME                       READY     STATUS              RESTARTS   AGE 
options-2554117421-5dwws   0/1       ContainerCreating   0          11s 
options-2554117421-7ec17   0/1       ContainerCreating   0          11s 

$ kubectl get pods 
NAME                       READY     STATUS    RESTARTS   AGE 
options-2554117421-5dwws   1/1       Running   0          4m 
options-2554117421-7ec17   1/1       Running   0          4m 

You can validate docker process is running by

$ vagrant ssh node-1 -c 'sudo docker ps'
CONTAINER ID        IMAGE                                                                  COMMAND                  CREATED             STATUS              PORTS               NAMES 
1b56f4a3222a        kartikshah/options-analyzer                                            "java -Djava.security"   3 minutes ago       Up 3 minutes                            k8s_options.e44b7492_options-2554117421-5dwws_default_b7a648ff-5a58-11e6-9527-08002769954a_0da80b48 


Step 3: Find IP address of the node

Describe all to find the IP address of the node.

$ kube describe all 
…
Name:        options-2554117421-7ec17 
Namespace:    default 
Node:        kubernetes-node-2/10.245.1.4 
Start Time:    Thu, 04 Aug 2016 10:32:56 -0500 
Labels:        pod-template-hash=2554117421 
        run=options 
Status:        Running 
IP:        10.246.21.3 
…

The IP address listed agains “IP” is the IP address this node is known inside the cluster. You can run a simple curl command from inside the node

$ vagrant ssh node-1 -c 'curl http://10.246.21.3:8080/'
Hello Options Trader, how are you? Connection to 127.0.0.1 closed.


Step 4: Expose Service Loadbalancer

Now let’s expose the pods running on both nodes using a LoadBalancer. Kubernetes load balancer are deployed as Replication Controller (or newer Replication Set). There are three types of Load Balancer options:
1. ClusterIP - Exposes an IP only available from within Kubernetes Cluster
2. NodePort - Exposes special port on a special node IP, but load balances across nodes.
3. LoadBalancer - Only provided by cloud providers e.g. Google, AWS, OpenShift

There is active development going on providing the LoadBalancer option on bare metal Kubernetes deployment. You can read more about it here at service-loadbalancer

We will use NodePort type of replication set to expose as service to outside world.

$ kubectl expose rs options-2554117421 --port=8080 --target-port=8080 --name=option-service --type=NodePort 
service "option-service" exposed 

Describe the service to get node ip and port that is exposed to host machine.

$ kubectl describe service
… 
Name:            option-service 
Namespace:        default 
Labels:            pod-template-hash=2554117421 
            run=options 
Selector:        pod-template-hash=2554117421,run=options 
Type:            NodePort 
IP:            10.247.237.53 
Port:                8080/TCP 
NodePort:            30728/TCP 
Endpoints:        10.246.21.3:8080,10.246.33.5:8080 
Session Affinity:    None 
...

Now you can access the service from you host machine. In my case from the Mac which is running the VirtualBox VMs.

$ curl http://10.245.1.4:30728/
Hello Options Trader, how are you?

There you have it - a Kubernetes cluster running a Docker image across multiple VMs (nodes) with NodePort loadbalancing.

Step 5: Console
This step is optional. If you want to explore the Kubernetes dashboard UI, you have to setup a private certificate. One of the ways Kubernetes dashboard UI authenticates is via identity cert. You can create this identity cert as follows:

#Copy the certs from master node
vagrant ssh master-c 'sudo cp /srv/kubernetes/kubecfg.* /vagrant/ && sudo cp /srv/kubernetes/ca.crt /vagrant/'
#Move them to separate folder
mv kubecfg.* ../certs/ && mv ca.crt ../certs/
#Create private cert using open ssl
openssl pkcs12 -export -clcerts -inkey ../certs/kubecfg.key -in ../certs/kubecfg.crt -out kubecfg.p12 -name "ks-kubecfg”
#For Mac only; open the private cert to install it in Keychain Access
open kubecfg.12

Now you can visit the dashboard by visiting the URL provided at the startup message.
https://10.245.1.2/api/v1/proxy/namespaces/kube-system/services/kubernetes-dashboard
Friday, July 22, 2016

Setting up development environment with Docker, Maven and IntelliJ

This post walks through the setup of development environment for Docker with IntelliJ using Maven. We will use a Spring boot application and configure IntelliJ for iterative development.

Spring Boot Application

The demo application is a simple one page app which displays a chart of VIX index. We will wire Quandl’s web service to fetch the historical data about VIX index and use CanvasJS charting library to display the chart. You can learn more about Spring Boot application with this Spring GuideHere are some highlights:

Application.java

@SpringBootApplication is the convenience annotation that marks the class as an entry point.


AppConfig.java

Setup Spring wiring using java in this class. It is any class that is marked with @Configuration annotation.


View - JSPs

Application’s view pages are under /webapp/WEB-INF/jsp.  application.properties file provided configuration to wire Spring’s view resolver.

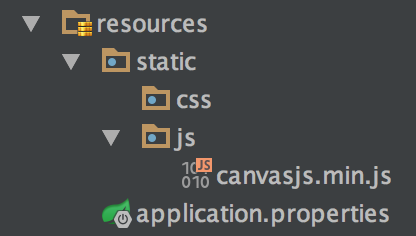
Static Content

Application’s static content under src/main/resources/static as below.


You can find entire source code here on github


pom.xml

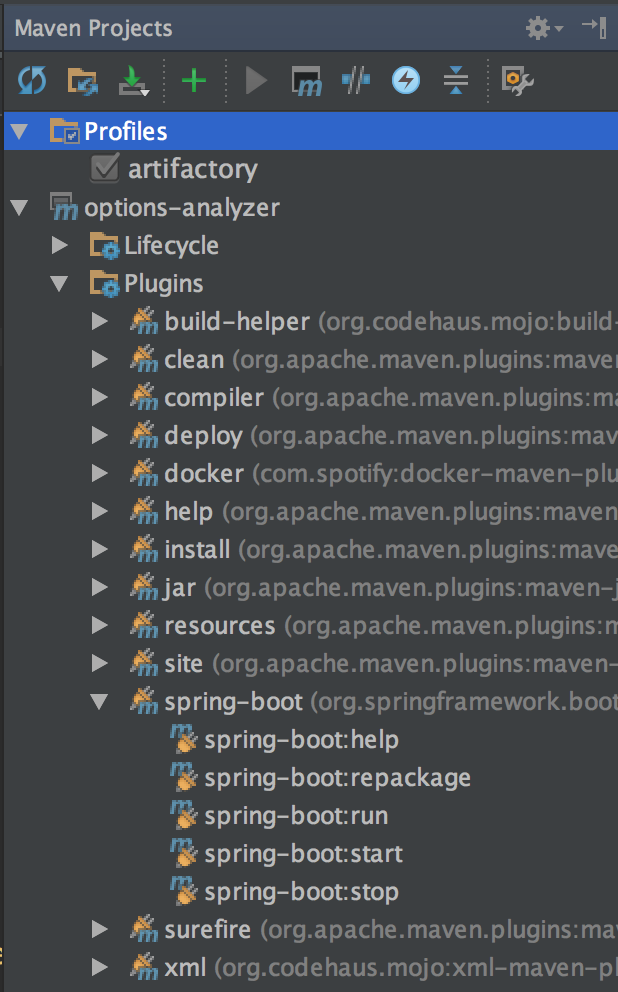
spring-boot-maven-plugin make executing lifecycle events easier. If you open IntelliJ’s Maven window, you will see all spring-boot-run, which will allow you to run the project. You can also create run configuration for easy access.


Setting up Docker

You can setup Docker environment by following instructions from docker for mac documentation.


Docker, Maven and IntelliJ

We will use docker-maven-plugin from com.spotify

Docker file
Create src/main/docker/Dockerfile. 


pom.xml
Configuration for docker plugin


ServerId tag specifies the docker repository you want to push to. The credentials to the serverId needs to be provided in your maven settings.xml. You have option of mvn encrypting the password. Follow instructions here


Run Configuration
To get it running in IntelliJ, you can setup Run Configuration as follows: 
1. Open Run -> Edit Configuration
2. Add Maven Configuration
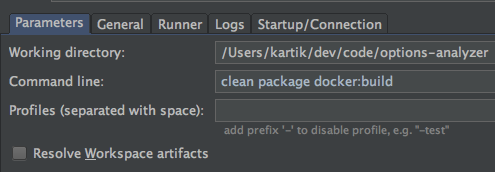
3. Provide maven command line as clean package docker:build

4. Go to the Runner tab and provide environment variables


     5. Similarly, you can also create docker:push run configuration, if you want to push docker image to docker registry. 


Monday, October 13, 2014

Web Service implemented as JAX-WS and JAX-RS

This post walks you through exposing a java web service implementation as both SOAP and REST service. This project uses Apache CXF as a framework to implement JAX-WS and JAX-RS based service on same implementation class.

https://github.com/kartikshah/sample-soap-rest

Web Service Interface

Here is the simple web service interface that has the annotations to expose it as both JAX-WS and JAX-RS endpoint.

Contract - WSDL and WADL

One of the crucial benefit of web service is that contract is either written or generated which serves as integration document. For that purpose, in my opinion, it is essential that either a WSDL or WADL is generated for methods exposed as web service. This applies specifically when using implementation first approach. 

WADL

You can also generate WADL in JSON form by appending

?_wadl&_type=json

WADL generation

WadlGenerator configuration in spring application context is key to generating correctly linked representation.


Wednesday, February 01, 2012

JAXB - Unmarshal non root element

While generating JAX-WS web service client code using wsimport, it generates Object factory top level method input and output type. This restricts the use to marshal and unmarshal classes which are contained within the top level objects.

More often than not, top level Schema objects are non-domain specific objects like MethodInput/MethodOutput. You can unmarshal them using ObjectFactory

ObjectFactory.java

query.xml

MethodInput.java

JaxbUnmarshallerMethodInput.java

But if you want to unmarshal XML chunks of objects contained within those top level object, the same approach does not work, if those generated classes are not included as part of ObjectFactory or they do not have annotation @XmlRootElement on top of that.

account.xml

Option 1
So the obvious option is to add @XmlRootElement to any generated classes that you want to unmarshal directly, but when you are using wsdls are from an external source, idea of updating generated classes breaks the process. 

Option 2
Another option is to pass the child element's Node object to unmarshal 


Saturday, July 09, 2011

SOA Composite deployment - Oracle SOA Suite

This post is going to be about very specific subject - SOA Composite deployment on Oracle SOA Suite. I am going to capture few issues faced while deploying SOA composite. 


Sample Composite

For purpose of this blog, consider a simple SOA composite that does the following: 

  • Read entries from a database
  • Create XML from the entries
  • Store XML entries to another database
  • Read XML entries 
  • Post each XML entry to a web service 

There is good amount of workflow and business logic that makes it a perfect use case for doing it with BPEL, but that is beyond the purpose of this entry. 


Composite Dependencies

Sample SOA composite had following dependencies: 

  • Couple of Datasource (one to read source data and other to store XML Entries)
  • JMS Queue (Weblogic’s Uniform Distributed Queues) 

Deployment Process

1. Datasources

Create Generic Datasources pointing to individual Oracle RAC node and a Multi Datasource using WLST scripts. (Most of the scripts are written for Weblogic 10.3.3, so haven’t explored newly introduced GridLinked Datasource in Weblogic 10.3.4.)


2. JMS Resources

Create JMS Server, JMS Module, Sub deployment, Connection Factory and JMS Queues using WLST scripts.


3. DBAdapter.rar

The composite uses DBAdapter connector to interact with databases, so add outbound connection pools the DBAdapter.rar pointing to actual Weblogic Datasources and redeploy application


4. Deploy Composite

Finally, deploy the composite using Enterprise Manager Console. 


Lessons Learned 


1. Server Start parameters

Using Enterprise Manager to deploy, the deployment window got stuck and never returned back. The issue, it turns out, is that the deployment was not able to communicate among instance servers. If SOA cluster is using multicast to communicate across weblogic instances, you will required following parameters on each server instance. The parameter adds well known address

-Dtangosol.coherence.wka1=soa01.mycompany.com -Dtangosol.coherence.wka2=soa02.mycompany.com -Dtangosol.coherence.localhost=soa01.mycompany.com -Xmx2048m

2. Failure updating DBAdapter.rar connector application

On attempt to create outbound connection pool pointing to weblogic datasource, activation fails complaining FileNotFoundException: Plan.xml. The file is present on the primary server instance, but it isn't replicated on other nodes. I am not sure why but for some reason the Plan.xml was required to present on all the nodes, even if deployment is being done from machine with AdminServer. 


3. Failure on interaction with DB on some instances.  

Even after the deployment was successful, any DB activities from nodes other than primary node failed giving following error:

BINDING.JCA-12511
JCA Binding Component connection issue.
JCA Binding Component is unable to create an outbound JCA (CCI) connection.
apptools:InsertLogDB [ InsertLogDB_ptt::insert(TestLogCollection,TestLogCollection) ] : The JCA Binding Component was unable to establish an outbound JCA CCI connection due to the following issue: BINDING.JCA-12510 JCA Resource Adapter location error.
Unable to locate the JCA Resource Adapter via .jca binding file element <connection-factory/> The JCA Binding Component is unable to startup the Resource Adapter specified in the <connection-factory/> element:  location='eis/DB/application-ds'. The reason for this is most likely that either 1) the Resource Adapters RAR file has not been deployed successfully to the WebLogic Application server or 2) the '<jndi-name>' element in weblogic-ra.xml has not been set to eis/DB/application-ds. In the last case you will have to add a new WebLogic JCA connection factory (deploy a RAR). Please correct this and then restart the Application Server

Please make sure that the JCA connection factory and any dependent connection factories have been configured with a sufficient limit for max connections. Please also make sure that the physical connection to the backend EIS is available and the backend itself is accepting connections.

One noticeable thing on weblogic console was that under testing tab of DBAdapter.rar all outbound connection pools were not visible. The issue is that updated Plan.xml is not replicated to all other nodes. You have to manually copy the Plan.xml containing all outbound connection pool to all server instance nodes. 
Here is what you need to do:
  • Copy the Plan.xml containing all outbound connection pool to all nodes
  • Update the connector application DBAdapter.rar
  • Restart DBAdapter.rar and Application server instance


4. BAM Cluster Multicast misconfiguration

A misconfiguration on the Multicast address of BAM cluster resulted in Access Forbidden 403. The issue was that BAM server was trying to communicate with another environment cluster. (i.e. prod bam cluster trying to communicate with test bam cluster). 

Here is the error: 

<BEA-000141> <TCP/IP socket failure occurred while fetching statedump over HTTP from 142374575950937656S:10.50.XX.XXX:[XXXXX,XXXXX,-1,-1,-1,-1,-1]:soa:soa_server1.
java.io.FileNotFoundException: Response: '403: Forbidden' for url: '
 http://10.50.XXX.XXX:16101/bea_wls_cluster_internal/psquare/p2?senderNum=3&lastSeqNum=0&PeerInfo=10,3,4&ServerName=soa_server1'
        at weblogic.net.http.HttpURLConnection.getInputStream(HttpURLConnection.java:487)
        at weblogic.cluster.HTTPExecuteRequest.connect(HTTPExecuteRequest.java:67)
        at weblogic.cluster.HTTPExecuteRequest.run(HTTPExecuteRequest.java:83)
        at weblogic.work.ExecuteThread.execute(ExecuteThread.java:207)
      at weblogic.work.ExecuteThread.run(ExecuteThread.java:176)

So make sure that the Mutlicast address and port combination used for BAM cluster and SOA cluster is unique. There is a Multicast test utility that you can use to test communication between two instance. More information about the utility is available here. Also refer this to troubleshoot Multicast configuration.

export CLASSPATH=${CLASSPATH}:[bea_home]/server/lib/weblogic.jar
On  Machine A:

java utils.MulticastTest -A [multicast address] -P [multicast port] -N TestServer1
On Machine B:
java utils.MulticastTest -A [multicast address] -P [multicast port] -N TestServer2 


Hope this helps!. 


Wednesday, April 20, 2011

OSB Project Structure

I am doing some development with Oracle Service Bus (OSB). The primary goal is to mediate web services using OSB. Oracle does provide set of eclipse plugins to develop OSB configuration - OEPE suite. One of question that I wanted answer was what will be a good project structure to organize various components of OSB configuration.

Typically, OEPE plugins gives two eclipse project templates:

  • Oracle Service Bus Configuration Project
  • Oracle Service Bus Project

OSB Config project is the top level project which can include various OSB Project. A minimal OSB project includes components like business service, proxy service and WSDL. It is important to come up with a good project structure since the component shows up as is on sbconsole. You probably don't want to see all the components at same level.

After this exercise, I ended up with following structure of the project that I wanted to share. So here it is,

The top level project - OSB Config Project - represents a business domain. So OSB configuration of all services serving a particular domain goes under that umbrella. Individual OSB Project contains mediation component for a given physical service. I used folders to group business and proxy services to allow for multiple proxy services for a given business service. Using this structure it becomes easy to manage configuration using sbconsole.

I ended up using the ant build script and import/export WLST script by tweaking the ones given as part of this book - The definitive guide to SOA. The build script can export configuration from local server or workspace. Import deploys it to the target server. The import/export script also takes care of variables that changes from environment to environment. OSB has a features to create customization XMLs. You can create customization XML per environment and run it post configuration package deployment.

Saturday, September 25, 2010

Revisiting JMX DSL with Groovy GEP3

In one of the previous blog post, I experimented with a sample DSL for JMX reporting using Jfree chart. Groovy 1.8.2 (Beta) has introduced command expression language. This GEP-3 essentially allows you to create command expression language which can further simplify language of DSL. The primary use of this is to aid in writing impromptu scripts to visually demo various MBean values. In this example we will see bar charts for module processing time for all web modules.

Command expression language allows you to alternate method name and parameter for even number of argument
e.g.
foo a1 a2 a3 a4 a5. Foo(a1).a2(a3).a4(a5)
You can find more example and explanation on GEP-3 page.

Revisiting JMX example so that I can simplify the language as

server.url "service:jmx:rmi://localhost/jndi/rmi://localhost:1090/jmxconnector" query "jboss.web:*" filter "j2eeType=WebModule"
def filteredModules = server.filteredModules

chart.type "Bar" modules filteredModules title "Module Processing Time" width 1200 height 700 refresh 500 attributes params labels graphLabels
chart.show()

Let's look at the supporting code.

import org.jfree.chart.ChartFactory
import groovy.swing.SwingBuilder

import org.jfree.data.category.DefaultCategoryDataset
import org.jfree.chart.plot.PlotOrientation as Orientation
import javax.swing.WindowConstants as WC
import javax.management.ObjectName
import javax.management.remote.JMXConnectorFactory
import javax.management.remote.JMXServiceURL as JmxUrl
import javax.naming.Context

class Chart {
    def chartModules
      def chartType
    def chartAttributes = {m -> [m.processingTime, m.path]}
    def chartLabels =["Time per Webapp", "Webapp", "Time"]
    def chartOptions = [false, true, true]
    def windowTitle
    def w
    def h
    def refreshRate
    def orientation = "VERTICAL"
    def dataset

    def modules(m) {
          chartModules = m
          this
      }

      def type(type) {
        chartType = type
         this
      }

      def attributes(attr) {
        chartAttributes = attr
        this
      }

      def labels (lbls) {
        chartLabels = lbls
        this
      }

      def options (opts) {
        chartOptions = opts
        this
      }

      def title (title) {
        windowTitle = title
        this
      }

      def width(width) {
        w = width
        this
      }

      def height(height) {
        h = height
        this
      }

      def refresh(r) {
        refreshRate = r
        this
      }

    void show(){
        switch(chartType){
            case "Bar": drawBarChart(); break;
            default: break;
        }
    }

    void drawBarChart(){
        calculateData()
        def chart = ChartFactory.createBarChart(*chartLabels, dataset, Orientation."${orientation}", *chartOptions)
        def swing = new SwingBuilder()
        def frame = swing.frame(title:windowTitle, defaultCloseOperation:WC.EXIT_ON_CLOSE){
            panel(id:'canvas') {rigidArea(width:w, height:h)}
        }
        while(true){
            calculateData()
            chart.fireChartChanged()
            frame.pack()
            frame.show()
            chart.draw(swing.canvas.graphics, swing.canvas.bounds)
            sleep(refreshRate)
        }
    }
    void calculateData(){
        def newDataset = new DefaultCategoryDataset()
        chartModules.each{ m ->
            def dsCall = chartAttributes.call(m)
            newDataset.addValue dsCall[0], 0, dsCall[1]
        }
        this.dataset = newDataset
    }
}


class Server {
    def server
    def queryObjects
    def moduleFilter
    def filteredModules

    def url(serverName){
    server = JMXConnectorFactory.connect(new JmxUrl(serverName)).MBeanServerConnection
    this
    }

    def query (queryString) {
        queryObjects = new ObjectName(queryString)
       this
    }

    def filter (filterString) {
         String[] allNames = server.queryNames(queryObjects, null)
        filteredModules = allNames.findAll { name -> name.contains(filterString)}.collect { new GroovyMBean(server, it)}
    }
}

server = new Server()
chart = new Chart()
params = {m -> [m.processingTime, m.path]}
graphLabels = ["Time per Webapp", "Webapp", "Time"]

server.url "service:jmx:rmi://localhost/jndi/rmi://localhost:1090/jmxconnector" query "jboss.web:*" filter "j2eeType=WebModule"
def filteredModules = server.filteredModules

chart.type "Bar" modules filteredModules title "Module Processing Time" width 1200 height 700 refresh 500 attributes params labels graphLabels
chart.show()

Problems faced
For some reason with the current beta build I couldn't do arrays or closures inline. so I had to put them as separate variables. I do not think it is by design and as 1.8.X comes close to release these wrinkles will be worked out.
Blogged with the Flock Browser

Wednesday, March 31, 2010

Data as Service - Thoughts

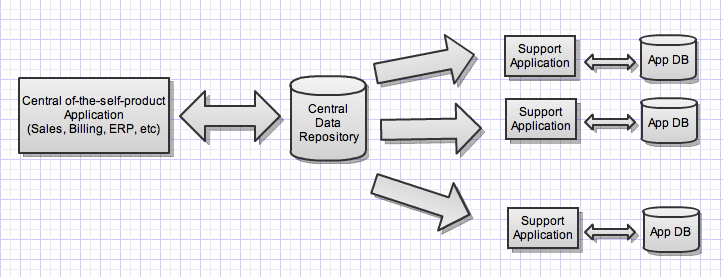
I am exploring multiple ways to expose data as a service. Let's take a brief look at problem description. You have a central data repository which acts as source of truth for multiple supporting application. These supporting applications usually reads data and manipulate/transform it and do what it needs to do with it.

data-as-a-service.png

This is not very atypical scenario. In most of the organization you will have a central application - usually of the shelf product with specific customization. e.g. ERP systems, Billing systems, CRM systems etc. The data store supporting this application is not flexible to customization. You will also find supporting applications for custom needs of organization to use the central data store. In usual scenarios this application will be handling this via direct read from central data store - potentially giving way to duplication of effort to manage this objects.

These problems have been solved in multiple ways.
  1. Allow each individual supporting application to access data directly or indirectly through data warehouses
  2. Expose the catalog of finely-tuned queries expose by the supporting application as web services.
  3. Define organization wide data directory containing well defined business entities/objects and expose web services to retrieve defined entities.
Types of Services
We can classify this data services in multiple categories
  • Data-Read Services - These are plain and simple data read or data lookup services. This services provide only minor transformation like column renames, etc
  • Transformation Services - These services provide some transformation of data. It operates on the column performs operation like truncation, concatenation, etc.
  • Filtering Services - These services allows opportunity to filter data based on input conditions. e.g provide active accounts, provide prospect accounts, etc.
  • Aggregation Services - These services provides performs certain aggregation function. e.g. sales by region, accounts by regions, etc. Though this logic could have served better purpose if kept in application, there are some performance benefits to do this in the data store layer.

Define Business Entities data dictionary
First and foremost identify organization wide data dictionary for the domain. This data dictionary is the definition of entities that applications needs to use. So there is not duplication. It also reduces confusion. For example, an entity named BillingAccount will mean the billing account for any application using it. This solves a larger problem, in the scenario where the supporting applications use the data directory it defines these central entities in multiple ways. So over time the definition of the same thing becomes convoluted. e.g. account number for application A is 10 digits and same for application b is first 8 digits of that. This results in duplication of data that can not inter operate. Defining a central data dictionary and allowing exchange of that in that contract helps avoid this problem.

Logical Representation
In most scenario the data store that comes bundled with the product is really generic so that product can be customized to different business. eg. ACCTPF having fields like ACCTPFNO, ACCTPFHONO, etc. One side effect can be seen on naming convention of entities and its properties. They are wierdly named and does not make any sense without actually looking at product documentation. My take is that some naming transformation is required. This can be done by "select as" queries or actually overlaying a logical data model on top of the existing one. Of course after performance consideration.

Expose as Web Service
Once you have the logical representation any of following two options can be followed
  • Write Select queries and expose them as either SOAP/REST web services
  • If select queries does not provide necessary transformation/aggregation, write db procedures and expose them as a service.
    • One of the sub variation of this scenario is to use DB specific data structures. (In case of Oracle, use oracle's user defined types). Performance consideration is essential because remember these services may very well be the most atomic activity overarching application will perform and it is essential that each data read is trivial and inexpensive.

Just some thoughts...


Blogged with the Flock Browser

Tuesday, March 16, 2010

Using Groovy Scriptom to report on Outlook

As with most work places, I use MS Outlook Calendar at work for meetings, calendars, etc. With Outlook 2007 you have capability to categorize each meeting/time block that you have on your calendar. So you can classify each meeting as either design, architecture, learning, recurring, etc. Using Groovy Scriptom module you can do what you would usually do using VBScript. Scriptom allows you to use ActiveX windows components from Groovy. Needless to say this will only work on windows platform.

I used the scriptom to report on how I am spending my time. (ah.. have to fill those time sheet) Using Swingbuilder and JFreeChart, I threw in this simple script. You will need to setup dependency exactly as described on the help page here.

import org.codehaus.groovy.scriptom.ActiveXObject
import org.jfree.chart.ChartFactory
import javax.swing.WindowConstants as WC

def outlook = new ActiveXObject("Outlook.Application")
def namespace = outlook.GetNamespace("MAPI")
def calFolder = namespace.GetDefaultFolder(9)
def myItems = calFolder.Items

def today = new Date()
startWeek = today - 7
endWeek = today + 7
def categoryMap = [:]

for (i in 1..myItems.Count.value) {
     def currentMeeting = myItems.Item(i)
     if (currentMeeting.Start >= startWeek && currentMeeting.Start <= endWeek) {
           println "Subject: " + currentMeeting.Subject.value
           println "Category: " + currentMeeting.Categories
           println "Duration: " + currentMeeting.Duration.value

           category = currentMeeting.Categories
           durationValue = currentMeeting.Duration.value

           def value = categoryMap.get(category)
           value = value?value:0
           def newValue = value + durationValue
           categoryMap.put(category,newValue);
     }
}

def swing = new groovy.swing.SwingBuilder()
def titleString = 'Time Outlook: ' + String.format('%tm/%<td/%<tY', startWeek) + "-" + String.format('%tm/%<td/%<tY', endWeek)
def frame = swing.frame(title:titleString,
                        defaultCloseOperation:WC.EXIT_ON_CLOSE,
                        size:[800,600], locationRelativeTo: null) {
     borderLayout()
     panel(id:'canvas') { rigidArea(width:700, height:500) }
 }

def bounds = new java.awt.Rectangle(0,0, 700,500).bounds
def piedata = new org.jfree.data.general.DefaultPieDataset()
for(entry in categoryMap)
{
  piedata.setValue entry.key + " = " + entry.value, entry.value
}
def options = [false, true, false]
def chart = ChartFactory.createPieChart(titleString, piedata, *options)
chart.backgroundPaint = java.awt.Color.white
frame.pack()
frame.show()
chart.draw(swing.canvas.graphics, bounds)

Simple enough script... It gets the ActiveXObject for Outlook application. Then from namespace it gets calendarFolder (constant 9). You can find out more about constant here. calFolder contains all the meeting appointmentItems. Once you get to the appointmentItem you can ask for the properties using groovy dot-notation.

Here is the snapshot of the output

groovy-scriptom-outlook.png

Blogged with the Flock Browser

Sunday, February 28, 2010

Revisit Jmx Groovy DSL - Using AstTransformation

In the previous blog entry, we created Jmx Charting DSL. Let visit some aspects of creating DSL using groovy.

In the previous blog example we created DSL using ExpandoMetaClass. Users will define the script starting with node jmx { }. With the use of ExpandoMetaClass we added the dynamic method which in turn delegated to class JmxClosureDelegate. Here is the snippet of the code.

static void runEngine(File dsl){
    Script dslScript = new GroovyShell().parse(dsl.text)
    dslScript.metaClass = createExpandoMetaClass(dslScript.class, {
      ExpandoMetaClass emc ->
        emc.jmx = {
          Closure cl ->
            cl.delegate = new JmxClosureDelegate()
            cl.resolveStrategy = Closure.DELEGATE_FIRST
            cl()
        }
    })
    dslScript.run()
   }
What we essentially did here:
  • Using GroovyShell it parses the script file passed as input.
  • Defines the ExpandoMetaClass and adds method by name "jmx" having closure as parameter.
So the script file you wrote gets a dynamic method injected into it using ExpandoMetaClass. This happens at runtime.

Getting rid of the Commas
The problem with creating methods with two arguments is that you have to specify commas between them. For example,

     server "nameofserver", {
          ...
     }
Undoubtedly commas clutter the langauge grammer. To get rid of the commas we used trick provided on Groovy users list.

//To avoid using "," between String and Closure argument 
  def methodMissing(String name, args) { 
    return [name, args[0]] 
  } 

Using AstTransformation
Now lets explore a different possibility. You can achieve similar result using AstTransformation at compile time. The goal remains the same and that is to add method with name "jmx" with closure parameter.

First we will define the annotation.

//import statements skipped for brevity
@Retention(RetentionPolicy.SOURCE)
@Target([ElementType.METHOD])
@GroovyASTTransformationClass(["info.kartikshah.jmx.ast.JmxDslTransformation"])
public @interface UseJmxDsl {}
Transformation Class

This transformation class needs to perform two activities:
  • Add method jmx(Closure cl) method
  • Invoke the script method being defined
We need to generate AST statements for following snippet of code.

     jmx = { 
          Closure cl -> 
            cl.delegate = new JmxClosureDelegate() 
            cl.resolveStrategy = Closure.DELEGATE_FIRST 
            cl() 
        } 
We will use AstBuilder's buildFromSpec option to generate it. (AstBuilders added with Groovy 1.7 definitely makes generating statement structure relatively easy and clutter free. Not to mention it is also an example of DSL added to the groovy language :-) )

@GroovyASTTransformation(phase = CompilePhase.SEMANTIC_ANALYSIS)
class JmxDslTransformation implements ASTTransformation {
  static int PUBLIC = 1
  static int STATIC = 8

  void visit(ASTNode[] astNodes, SourceUnit sourceUnit) {
    //Add method jmx(Closure cl)
    ClassNode declaringClass = astNodes[1].declaringClass
    MethodNode jmxMethod = makeMethod()
    declaringClass.addMethod(jmxMethod)

    //Insert method call inside run method of the script class
    MethodNode annotatedMethod = astNodes[1]
    List<MethodNode> allMethods = sourceUnit.AST?.classes*.methods.flatten()
    MethodNode runMethod = allMethods.find{ MethodNode method ->
      method.name == "run"
    }
    List existingStatements = runMethod.getCode().getStatements()
    existingStatements.add(0, createMethodCall(annotatedMethod))
  }

  Statement createMethodCall(MethodNode methodNode){
    def statementAst = new AstBuilder().buildFromSpec {
      expression{
         methodCall {
           variable "this"
           constant methodNode.name
           argumentList {}
         }
      }
    }
    Statement stmt = statementAst[0]
    stmt
  }

  MethodNode makeMethod() {
    def ast = new AstBuilder().buildFromSpec {
      method('jmx', PUBLIC | STATIC, Void.TYPE) {
        parameters {
          parameter 'cl': Closure.class
        }
        exceptions {}
        block {
          expression {
            binary {
              property {
                variable "cl"
                constant "delegate"
              }
              token "="
              constructorCall(JmxClosureDelegate.class) {
                argumentList()
              }
            }
          }
          expression {
            binary {
              property {
                variable "cl"
                constant "resolveStrategy"
              }
              token "="
              property {
                classExpression Closure
                constant "DELEGATE_FIRST"
              }
            }
          }
          expression {
            methodCall {
              variable "cl"
              constant "call"
              argumentList {}
            }
          }
        }
      }
    }
    MethodNode jmxMethod = ast[0]
    jmxMethod
  }
}
Why use AstTransformation?
The question is why one would want to use AstTransformation when you can add method during runtime. For the given scenario, it is correct that you want to stick with adding method runtime. But consider scenario where you want to "redefine" meaning of Groovy's syntax. For example like following imaginary script using Statement Labels to add more readability to your DSL syntax.

@info.kartikshah.jmx.ast.UseJmxDsl
runDsl () {
  jmx {
    setup:
      server "service:jmx:rmi://localhost/jndi/rmi://localhost:1090/jmxconnector"
      query "jboss.web:*"
      findAll "j2eeType=Servlet"

    draw:
    chart {
        chartType="Bar"
        attributes={m-> [m.loadTime, m.objectName.find("name=([^,]*)"){it[1]}]}
        labels=["Load Time per Servlet", "Servlet", "Time"]
        options=[false, true, true]
        windowTitle="JBoss Servlet Processing Time"
        width=1200
        height=700
        orientation="HORIZONTAL"
        refreshRate=5000
        show()
      }
  }
}
Spock Framework does similar twist by redefining meaning of existing construct.

With this type of language structure you will end up defining your own set of keywords, supporting parser and few AstTransformation to change the meaning of existing Groovy Syntax.


Blogged with the Flock Browser

Tuesday, February 16, 2010

A Groovy DSL - JMX Reporting

In previous blog example, using JFreeChart, JMX and SwingBuilder we came up with dashboard type utility. With this post we will explore how to write small DSL which will allow to report on JMX using reporting charts. The DSL will using Groovy's SwingBuilder to draw JFree Chart to report on various MBeans. This type DSL can be used to write small scripts to monitor behavioral aspect of application server (or any JMX based application).

Simple DSL
First we will chart out how we want our domain language to look like. DSL syntax can be done multiple ways. It is necessary that you play with the syntax to come up with one that works for the scenario. For our example, here is the first cut that we will use.

Essentially, the script reports processing time of all web modules defined on (in this example - JBoss) application server using Bar Chart.

jmx {
    server "service:jmx:rmi://localhost/jndi/rmi://localhost:1090/jmxconnector" {
      query "jboss.web:*" {
        findAll "j2eeType=WebModule" {
          chart{
            chartType="Bar"
            attributes={m-> [m.processingTime, m.path]}
            labels=["Time per Webapp", "Webapp", "Time"]
            options=[false, true, true]
            windowTitle="JBoss Module Processing Time"
            width=1200
            height=700
            refreshRate=5000
            show()
          }
        }
      }
    }
  }

Other Use cases
Target users for this DSL are system administrators who can write simple scripts to monitor and/or report on various aspects of app server instances graphically.

Some other use cases for this type of DSL
  • Compare Processing Time of Web Application
  • Compare Load Time of Servlets
  • Compare Response Time
  • Compare memory usage
  • Compare total requests
DSL Engine
With Groovy there are multiple ways to write domain specific language as described in groovy documentation here

We will use nested closure approach. More information about nested closure here.

Here we use ExpandoMetaClass and series of Delegate classes to handle each closure. In the sample script above read each node (eg. jmx, server, query) as a dynamic method call with one or two arguments. For example jmx has a string argument followed by closure argument. String argument is we just store in instance variable. For closure argument we delegate the handling to separate Delegate Class. We follow the same pattern for the rest of the nested nodes.

First up Engine
This is the main class for the DSL. It gets the file passed as command args and pass it to GroovyShell to create Script object. It uses ExpandoMetaClass to dynamically add methods/closure. It add adds jmx closure and sets properties for handling closure.

class JmxReportingDslEngine {
 
  static main(String[] args){
    if(args.length != 1)
    {
      println("Usage: JmxReportingDslEngine <ScriptFileName>")
    }
    runEngine(new File(args[0]))
  }
 
  static void runEngine(File dsl){
    Script dslScript = new GroovyShell().parse(dsl.text)
    dslScript.metaClass = createExpandoMetaClass(dslScript.class, {
      ExpandoMetaClass emc ->
        emc.jmx = {
          Closure cl ->
            cl.delegate = new JmxClosureDelegate()
            cl.resolveStrategy = Closure.DELEGATE_FIRST
            cl()
        }
    })
    dslScript.run()
   }

  static ExpandoMetaClass createExpandoMetaClass(Class clazz, Closure cl){
    ExpandoMetaClass emc = new ExpandoMetaClass(clazz, false)
    cl(emc)
    emc.initialize()
    return emc
  }
}

Delegates


Next up we write series of Delegate Class responsible for handling each node of the language.

JMXClosureDelegate
This handles closure passed to jmxtag. It instantiates MBeanServerConnection and passes the reference down to the delegate chain.

class JmxClosureDelegate {
//To avoid using "," between String and Closure argument
  def methodMissing(String name, args) {
    return [name, args[0]]
  }
  void server(param){
    def (serverUrl, cl) = param
    def server = JMXConnectorFactory.connect(new JmxUrl(serverUrl),env).MBeanServerConnection
    cl.delegate = new JmxServerClosureDelegate(server)
    cl.resolveStrategy = Closure.DELEGATE_FIRST
    cl()
  }

JMXServerClosureDelegate

This delegate handles closure passed to server tag.

class JmxServerClosureDelegate {
  def server
  JmxServerClosureDelegate(server){
    this.server = server
  }
  def methodMissing(String name, args) {
   return [name, args[0]]
  }
  void query(param){
    def (objectName, cl) = param
    def query = new ObjectName(objectName)
    String[] allNames = server.queryNames(query, null)
    cl.delegate = new JmxQueryClosureDelegate(allNames, server)
    cl.resolveStrategy = Closure.DELEGATE_FIRST
    cl()
  }
}
JmxQueryClosureDelegate
and so on...

class JmxQueryClosureDelegate {
  def allNames
  def server
  JmxQueryClosureDelegate(allNames, server){
    this.allNames = allNames
    this.server = server
  }
  def methodMissing(String name, args) {
    return [name, args[0]]
  }
  void findAll(param){
    def (filter, cl) = param
    def modules = allNames.findAll{ name ->
          name.contains(filter)
      }.collect{ new GroovyMBean(server, it) }
    cl.delegate = new JmxFindAllClosureDelegate(modules)
    cl.resolveStrategy = Closure.DELEGATE_FIRST
    cl()
  }
}
JmxFindAllClosureDelegate

class JmxFindAllClosureDelegate {
  def modules
  JmxFindAllClosureDelegate(modules){
    this.modules = modules
  }
  void chart(Closure cl){
    cl.delegate = new ChartDelegate(modules)
    cl.resolveStrategy = Closure.DELEGATE_FIRST
    cl()
  }
}
ChartDelegate
This class
  • Creates the dataset from the MBean values
  • Creates the chart with the dataset values
  • Creates the external frame using SwingBuilder

class ChartDelegate {

  def modules
  def chartType
  def attributes
  def labels
  def options
  def windowTitle
  def width
  def height
  def refreshRate
  def orientation = "VERTICAL"
  def dataset
  ChartDelegate(modules){
    this.modules = modules
  }
  void show(){
    switch(chartType){
      case "Bar": drawBarChart(); break;
     //TODO:Add more chart types
      default: break;
    }
  }
  void drawBarChart(){
    calculateData()
    def chart = ChartFactory.createBarChart(*labels, dataset, Orientation."${orientation}", *options)
    def swing = new SwingBuilder()
    def frame = swing.frame(title:windowTitle, defaultCloseOperation:WC.EXIT_ON_CLOSE){
      panel(id:'canvas') {rigidArea(width:width, height:height)}
    }
    while(true){
      calculateData()
      chart.fireChartChanged()
      frame.pack()
      frame.show()
      chart.draw(swing.canvas.graphics, swing.canvas.bounds)
      sleep(refreshRate)
    }
  }
  void calculateData(){
    def newDataset = new DefaultCategoryDataset()
    modules.each{ m ->
      def dsCall = attributes.call(m)
      newDataset.addValue dsCall[0], 0, dsCall[1]
    }
    this.dataset = newDataset
  }
}
Output
Let's run and look at sample output...

web-app-processing-time

Click here for bigger images

Here is another script for Servlet Load Time

This one uses some intermediate groovy knowledge with attributes param taking a closure. It allows user to perform transformation on the MBean parameters. Below in the script it performs operates on long objectName attribute to get servlet name parameter.

jmx {
    server "service:jmx:rmi://localhost/jndi/rmi://localhost:1090/jmxconnector" {
      query "jboss.web:*" {
        findAll "j2eeType=Servlet" {
            chart{
              chartType="Bar"
              attributes={m-> [m.loadTime, m.objectName.find("name=([^,]*)"){it[1]}]}
              labels=["Load Time per Servlet", "Servlet", "Time"]
              options=[false, true, true]
              windowTitle="JBoss Servlet Processing Time"
              width=1200
              height=700
              orientation="HORIZONTAL"
              refreshRate=5000
              show()
            }
        }
      }
    }
}
and here is the output...

servlet-load-time

Click here for bigger image

Further you can,
  • Add different type of chart support to the DSL - Bar, XY, trending, etc
  • Use/Extend to work with different application server and/or application

Complete source code can be found at http://github.com/kartikshah/jmx-dsl
Blogged with the Flock Browser

Friday, February 05, 2010

Exploring Google Collections - Part 2

In Part 1, we focused on few classes of google collection. Here in part 2, we will expand on the simple scenario and work on DOM like tree structure scenario.

Consider a scenario of an external API provided by vendor. The API had tree like data structure, described by diagram below.

Node Component Diagram
Now the problem was that the main data structure part of external API was POJO. Though it was a tree structure it did not provide any operations for traversal or find operations. Here is the watered down version of the component.
public class NodeComponent {
private String name;
private List<NodeComponent> children;
private Map<String, String> attributes;

public NodeComponent(String name)
{
this.name = name;
}

// Getters and Setters omitted for brevity
}

Let's see how google collection can be used to provide nice searcher methods. Consider following use cases:
  • Find child nodes based on node name
  • Find child nodes based on attribute name and value
  • Find child nodes on composite criteria of node name and attribute name and value
Lets implement cases using google collections.

Case 1: Find child nodes based on node name
First we will define NodeNameCriteria implementing Predicate interface

public class NodeNameCriteria implements Predicate<NodeComponent>
{
private String nameCriteria;

public NodeNameCriteria(String nameCriteria)
{
this.nameCriteria = nameCriteria;
}

public boolean apply(NodeComponent node)
{
return node.getName().equals(nameCriteria);
}
}
Further, define NodeSearcher class which will represent current node and will provide all these helper methods

public class NodeSearcher
{
private NodeComponent currentNode;

public NodeSearcher(NodeComponent currentNode)
{
this.currentNode = currentNode;
}

public Collection<NodeComponent> findChildrenByNodeName(String name)
{
return Collections2.filter(currentNode.getChildren(),new NodeNameCriteria(name));
}
}
Case 2: Find child nodes based on attribute name and value
Similar to first approach, this requires creating a Predicate implementation, let's name it AttributeNameValueCriteria

public class AttributeNameValueCriteria implements Predicate<NodeComponent>
{
    private String nameCriteria;
    private String valueCriteria;

    public AttributeNameValueCriteria(String nameCriteria, String valueCriteria)
    {
        this.nameCriteria = nameCriteria;
        this.valueCriteria = valueCriteria;
    }

    public boolean apply(NodeComponent component)
    {
        Set<Map.Entry<String, String>> entrySet = component.getAttributes().entrySet();

        Set<Map.Entry<String, String>> matchedAttrSet = Sets.filter(entrySet, new Predicate<Map.Entry<String, String>>(){
            public boolean apply(Map.Entry<String, String> entry) {
                return nameCriteria.equals(entry.getKey()) &&
                    valueCriteria.equals(entry.getValue());
            }
        });
        return matchedAttrSet != null && !matchedAttrSet.isEmpty();
    }
}
Case 3: Find child nodes on composite criteria of node name and attribute name and value
So far so good but the real benefit of defining the Predicate comes with the third case. In this case what is needed is to define a criteria which is composition of NodeNameCriteria and AttributeNameValueCriteria. We don't need to define third criteria implementation. Instead we will use Predicates compose method. Add following implmentation of findChildrenByNodeNameAndAttributeNameValue to NodeSearcher
public Collection<NodeComponent> findChildrenByNodeNameAndAttributeNameValue(String nodeName, String attrName, String attrValue)
{
Predicate<NodeComponent> compositePredicate = Predicates.and(new NodeNameCriteria(nodeName),
                                                        new AttributeNameValueCriteria(attrName, attrValue));
     return Collections2.filter(currentNode.getChildren(), compositePredicate);
}
In simpler approach, one would have defined filter criteria as condition of if loop. But with implementing them as Predicate implementation, you can reuse criteria implementation and mix and match with help of following Predicates function and and or methods.

Blogged with the Flock Browser